
创建scrapy项目
# 安装scrapy
$ pip install scrapy
# 或者下载安装文件,https://pypi.python.org/pypi/Scrapy
# 安装文件包含两种,.whl(Python Wheel)和.tar.gz(source)
$ pip install Scrapy-1.4.0-py2.py3-none-any.whl

# 在windows下还需要安装pywin32,注意版本要和Python的版本一致,包括Python的位数,
# 例如32位Python2.7,那么就要安装pywin32的32位的版本,否则就是pywin32 x64的版本。
# 去sourceforge.net下载对应版本的pywin32,然后安装。(其他系统忽略)

# 进入要创建项目的文件夹
# shift + 右键 在当前文件夹打开命令窗口

# 创建一个标准的Scrapy项目,需要提前配置好Python的环境变量
$ scrapy startproject mySpider

# scrapy command will look like this...
$ scrapy <command> [options] [args]
scrapy的项目结构
mySpider/
   scrapy.cfg            # 项目的配置文件
   mySpider/
       __init__.py
       items.py
       middlewares.py    # 用户自定义的中间件
       pipelines.py
       settings.py       # 整个项目的可配置项都在这里,例如启用某个中间件
       spiders/          # 用户自定义的spider放在spiders目录下面
           __init__.py
           ...
创建一个Scrapy Spider
# 使用genspider命令创建一个名为jobs的spider,要爬去的网址是 https://newyork.craigslist.org/search/egr
$ scrapy genspider jobs https://newyork.craigslist.org/search/egr
注意事项:Scrapy 在生成时,会在
start_urls中自动添加前缀http://和后缀/,在使用scrapy genspider jobs https://newyork.craigslist.org/search/egr命令的时候,因为我们的args中已经添加了https://,这样就会冲突,在写爬虫的时候需要再三检查,需要把scrapy默认添加的前缀http://删掉。
生成的文件路径:mySpider/mySpider/spiders/jobs.py
# -*- coding: utf-8 -*-
import scrapy
class JobsSpider(scrapy.Spider):
    # 爬虫的名字,不能和其他的爬虫重名
    name = "jobs"
    # 允许爬虫爬取的域名列表
    allowed_domains = ["craigslist.org"]
    # 爬虫开始爬行的url列表
    start_urls = ['https://newyork.craigslist.org/search/egr/']

    # 爬虫的main方法,不可以改变方法名,不过可以添加其他的方法
    def parse(self, response):
        pass
配置代理
在 middlewares.py 中添加代理中间件
import base64

class ProxyMiddleWare(object):
    # overwrite process request
    def process_request(self, request, spider):
        # Set the location of the proxy
        # Use the following lines if your proxy requires authentication
        proxy_user_pass = "USERNAME:PASSWORD"
        setup basic authentication for the proxy
        encoded_user_pass = base64.b64encode(proxy_user_pass)
        request.headers['Proxy-Authorization'] = 'Basic ' + encoded_user_pass
在 settings.py 中启用代理中间件
SPIDER_MIDDLEWARES = {
    # '项目名.中间件文件名.自定义中间件的类型': 中间件的执行顺序
    'epg_spider.middlewares.ProxyMiddleWare': 1
}
写爬虫逻辑
# 将上一步parse方法中的pass去掉
def parse(self, response):

    # title 是基于xpath规则提取的文本部分
    # response 是爬取的页面的html源码,另外使用print(reponse),你可以得
    # 到类似<200 https://newyork.craigslist.org/search/egr> ,这意味
    # 着已经成功的连接到这个网页。
    # response 还可以使用css选择器的方式选择要爬取的数据,
    # response.css("css selector")
    # xpath的含义:提取<a>标签中的文本'Chief Engineer'
    # extract() 将提取相同XPath规则的网页上的每个实例。
    # extract_first() 将取列表中的第一个实例
    titles = response.xpath('//a[@class="result-title hdrlnk"]/text()').extract()
    #  the result is a list of Unicode strings,So you can loop on them, and yield one title per time in a form of dictionary.
    for title in titles:
        yield {'Title': title}
上面的xpath是爬取如下的文本数据
<a href="/brk/egr/6085878649.html" data-id="6085878649" class="result-title hdrlnk">Chief Engineer</a>
运行爬虫
$ scrapy crawl jobs
将爬取的数据存到csv文件中
$ scrapy crawl jobs -o result-titles.csv
Your Terminal should show you a similar result, which indicates success
'downloader/response_status_count/200': 2,
'finish_reason': 'finished',
'finish_time': datetime.datetime(2017, 5, 2, 17, 26, 30, 348412),
'item_scraped_count': 120,
'log_count/DEBUG': 123,
'log_count/INFO': 8,
item_scraped_count refers to the number of titles scraped from the page. log_count/DEBUG and log_count/INFO are okay; however, if you received log_count/ERROR you should find out which errors you get during scraping are fix your code.
In Terminal, you will notice debug messages like:
DEBUG: Scraped from <200 https://newyork.craigslist.org/search/egr>
The status code 200 means the request has succeeded. Also, downloader/response_status_count/200 tells you how many requests succeeded. There are many other status codes with different meanings; however, in web scraping they could act as a defense mechanism against web scraping.
XPath表达式语法:
nodename:选取此节点的所有子节点/:从根节点选取//:从匹配选择的当前节点选择文档中的节点,而不考虑它们的位置.:选取当前的节点..:选取当前节点的父节点@:选取属性
XML实例文档
<?xml version="1.0" encoding="ISO-8859-1"?>

<bookstore>

    <book>
      <title lang="eng">Harry Potter</title>
      <price>29.99</price>
    </book>

    <book>
      <title lang="eng">Learning XML</title>
      <price>39.95</price>
    </book>

</bookstore>
XPath表达式的写法:
| 路径表达式 | 结果 |
|---|---|
| bookstore | 选取 bookstore 元素的所有子节点 |
| /bookstore | 选取根元素 bookstore 注释:假如路径起始于正斜杠( / ),则此路径始终代表到某元素的绝对路径! |
| bookstore/book | 选取属于 bookstore 的子元素的所有 book 元素 |
| //book | 选取所有 book 子元素,而不管它们在文档中的位置 |
| bookstore//book | 选择属于 bookstore 元素的后代的所有 book 元素,而不管它们位于 bookstore 之下的什么位置 |
| //@lang | 选取含有属性名为 lang 的所有元素 |
Scrapy 架构
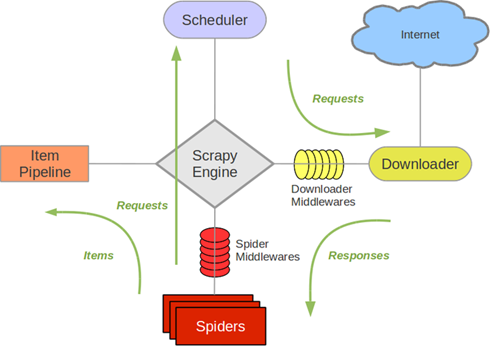 Scrapy中主要有上图所示的5大组件,其中有存储request的工作队列(Secheduler)、下载网页元素的下载器(Downloader)、有分配任务的引擎(Scrapy Engine)、处理页面逻辑的爬虫(Spider)、处理数据和存储数据的管道(Item Pipeline)。
Secheduler调度要执行的网页地址(URL),提交给Scrapy Engine,Scrapy Engine会通过Downloader Middlewares处理Requests(例如配置代理、处理异常),然后将任务分配给Downloader,下载网站上网页信息,返回Response通过Spider Middlewares筛选输入输出数据,交给Spiders,封装成Items传递给Item Pipeline,做最后一步数据处理,最后保存入数据库。
分布式爬虫 Scrapy-Redis
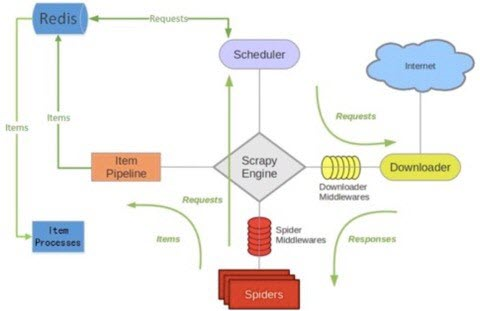 Scrapy自身的请求队列DeQueue并不支持Spider之间的共享,所以需要集成Scrapy-Redis,它将使用Redis队列替代DeQueue,使得Spider之间共享startRequests,从而实现分布式爬虫。这样就能够大规模的部署分布式爬虫集群,保证多个节点的同步传输支持海量数据抓取。
使用Redis缓存还有一个明显的好处就是可以避免重复请求,Scrapy Scheduler从redis的request queue中pop出一条请求时,会为当前请求计算出一个唯一的fingerprint,Scrapy会检测duplicate set中是否已经存在,如果存在就不会再请求当前的request,如果没有则放入duplicate set,set是天然的去重的数据结构,查询的算法复杂度是O(1),速度相当快。